
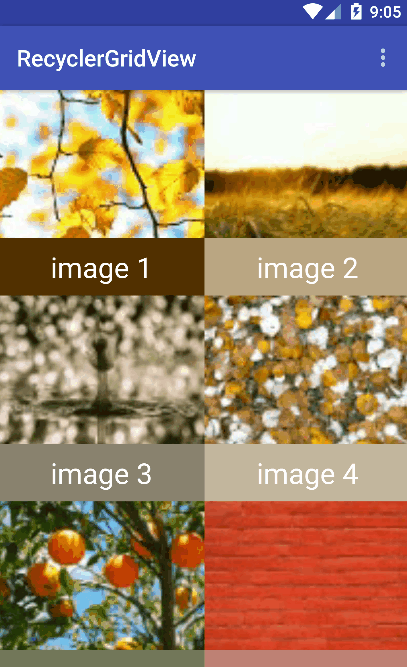
In our last tutorial, we have learnt how to implement a recyclerView and different elements of a recyclerview . As discussed, we have three different types of LayoutManger that we can use with a recyclerview.In this tutorial, we will create a simple Application that will create a recyclerview with GridLayoutManager and load pictures to it from resource directory. Also, we will use Palette library to pick a color from the image and add it to its bottom bar. You can clone this project from Github.here.
( Check this tutorial if you have not used Github with android studio before )
What is palette ?
Palette library was introduced with the release of Android Lollipop. Using palette library , we can dynamically pick color from an image.
We can generate a palette Asynchronously or Synchronously:
Asynchronous :
Palette.PaletteAsyncListener listener = new Palette.PaletteAsyncListener() {
  public void onGenerated(Palette palette) {
    // colors can be extract from palette here
  }
}

Bitmap bitmap= BitmapFactory.decodeResource(getResources(), R.drawable.image);

Palette.from(bitmap).generate(listener);
Synchronous :
Palette palette = Palette.from(bitmap).generate();We can get total 16 swatches from the palette object . But following are the most prominently using swatches :
Vibrant – use Palette.getVibrantSwatch()
Vibrant dark – use Palette.getDarkVibrantSwatch()
Vibrant light – use Palette.getLightVibrantSwatch()
Muted – use Palette.getMutedSwatch()
Muted dark – use Palette.getDarkMutedSwatch()
Muted light – use Palette.getLightMutedSwatch()
Each swatches will contain different colors and we can have them by using the following methods :
getPopulation( ):  the number of pixels represented by this swatch
getRgb() : this swatch's RGB color value
getHsl() : Return this swatch's HSL values
getBodyTextColor() : Returns an appropriate color to use for any 'body' text which is displayed over this swatch's color.
getTitleTextColor() : Returns an appropriate color to use for any 'title' text which is displayed over this swatch's color- Create a new Project in Android Studio. In this project we are using Glide to create bitmaps from images of the resource folder. After the bitmap is created, we will use Palette to pick color from the image and set it as background to the footer below that image view. For glide and Palette , we need to add the following lines to build.gradle’s dependencies tab
compile 'com.github.bumptech.glide:glide:3.7.0'
compile 'com.android.support:support-v4:23.1.1'
compile 'com.android.support:palette-v7:+'
2. Create one new activity ScrollingActivity and its layout as activity_scrolling
public class ScrollingActivity extends AppCompatActivity {

    @Override
    protected void onCreate(Bundle savedInstanceState) {
        super.onCreate(savedInstanceState);
        setContentView(R.layout.activity_scrolling);
        Toolbar toolbar = (Toolbar) findViewById(R.id.toolbar);
        setSupportActionBar(toolbar);


        RecyclerView recyclerView = (RecyclerView) findViewById(R.id.recyclerView);

        ArrayList<ImageObject> list = new ArrayList<>();

        list.add(new ImageObject(R.drawable.imageone,"image 1"));
        list.add(new ImageObject(R.drawable.imagetwo,"image 2"));
        list.add(new ImageObject(R.drawable.imagethree,"image 3"));
        list.add(new ImageObject(R.drawable.imagefour,"image 4"));
        list.add(new ImageObject(R.drawable.imagefive,"image 5"));
        list.add(new ImageObject(R.drawable.imagesix,"image 6"));
        list.add(new ImageObject(R.drawable.imageseven,"image 7"));
        list.add(new ImageObject(R.drawable.imageeight,"image 8"));
        list.add(new ImageObject(R.drawable.imagenine,"image 9"));
        list.add(new ImageObject(R.drawable.imageten,"image 10"));

        // 2. set layoutManger
        recyclerView.setLayoutManager(new GridLayoutManager(this,2));
        // 3. create an adapter
        RecyclerAdapter mAdapter = new RecyclerAdapter(list,this);
        // 4. set adapter
        recyclerView.setAdapter(mAdapter);
    }

    @Override
    public boolean onCreateOptionsMenu(Menu menu) {
        // Inflate the menu; this adds items to the action bar if it is present.
        getMenuInflater().inflate(R.menu.menu_scrolling, menu);
        return true;
    }

    @Override
    public boolean onOptionsItemSelected(MenuItem item) {
        // Handle action bar item clicks here. The action bar will
        // automatically handle clicks on the Home/Up button, so long
        // as you specify a parent activity in AndroidManifest.xml.
        int id = item.getItemId();

        //noinspection SimplifiableIfStatement
        if (id == R.id.action_settings) {
            return true;
        }
        return super.onOptionsItemSelected(item);
    }
}<?xml version="1.0" encoding="utf-8"?>
<android.support.design.widget.CoordinatorLayout xmlns:android="http://schemas.android.com/apk/res/android"
xmlns:app="http://schemas.android.com/apk/res-auto"
android:layout_width="match_parent"
android:layout_height="match_parent"
android:fitsSystemWindows="true">
<android.support.design.widget.AppBarLayout
android:layout_width="match_parent"
android:layout_height="wrap_content">
<android.support.v7.widget.Toolbar
android:id="@+id/toolbar"
android:layout_width="match_parent"
android:layout_height="?attr/actionBarSize"
android:theme="@style/ThemeOverlay.AppCompat.Dark"
app:popupTheme="@style/AppTheme.PopupOverlay"
app:layout_scrollFlags="scroll|enterAlways"/>
</android.support.design.widget.AppBarLayout>
<android.support.v7.widget.RecyclerView
android:id="@+id/recyclerView"
android:layout_width="match_parent"
android:layout_height="match_parent"
app:layout_behavior="@string/appbar_scrolling_view_behavior"
/>
</android.support.design.widget.CoordinatorLayout>
Here ,
-
We are creating one ArrayList ”list” of type ImageObject ( defined below)
-
Each ImageObject will contain url value of the resource image and name of that particular image
-
Layout manager is used as GridLayoutManager for the recyclerView
recyclerView.setLayoutManager(new GridLayoutManager(this,2));( 2 means two items should be shown in the grid View) -
Adapter for recyclerView is **RecyclerAdapter **that will hold the ArrayList “list” that we have created .
RecyclerAdapter mAdapter = new RecyclerAdapter(list,this); -
Set the adapter to the RecyclerView using
recyclerView.setAdapter(mAdapter);
- Create ImageObject class and adapter RecyclerAdapter
public class ImageObject {


    private String mName;
    private int mUrl;

    public ImageObject(int url,String name){

        this.mName = name;
        this.mUrl = url;
    }

    public String getTitle(){
        return this.mName;
    }

    public int getUrl(){
        return this.mUrl;
    }
}
public class RecyclerAdapter extends RecyclerView.Adapter<RecyclerAdapter.ViewHolder> {
private ArrayList<ImageObject> mListObjects = new ArrayList<>();
private Context mContext;
public RecyclerAdapter(ArrayList<ImageObject> listObjects, Context context) {
this.mListObjects = listObjects;
this.mContext = context;
}
@Override
public RecyclerAdapter.ViewHolder onCreateViewHolder(ViewGroup parent,
int viewType) {
View itemLayoutView = LayoutInflater.from(parent.getContext())
.inflate(R.layout.layout_item, null);
ViewHolder viewHolder = new ViewHolder(itemLayoutView);
return viewHolder;
}
@Override
public void onBindViewHolder(final ViewHolder viewHolder, int position) {
viewHolder.txtViewTitle.setText(mListObjects.get(position).getTitle());
Glide.with(mContext)
.load(mListObjects.get(position).getUrl())
.asBitmap()
.centerCrop()
.into(new SimpleTarget<Bitmap>(100,100) {
@Override
public void onResourceReady(Bitmap bitmap, GlideAnimation glideAnimation) {
viewHolder.imgViewIcon.setImageBitmap(bitmap); // Possibly runOnUiThread()
Palette.from(bitmap).generate(new Palette.PaletteAsyncListener() {
@Override
public void onGenerated(Palette palette) {
try {
viewHolder.textBackground.setBackgroundColor(palette.getDarkVibrantSwatch().getRgb());
viewHolder.txtViewTitle.setBackgroundColor(palette.getDarkVibrantSwatch().getTitleTextColor());
} catch (Exception e) {
e.printStackTrace();
}
}
});
}
});
}
public static class ViewHolder extends RecyclerView.ViewHolder {
private TextView txtViewTitle;
private ImageView imgViewIcon;
private LinearLayout textBackground;
public ViewHolder(View itemLayoutView) {
super(itemLayoutView);
txtViewTitle = (TextView) itemLayoutView.findViewById(R.id.item_title);
imgViewIcon = (ImageView) itemLayoutView.findViewById(R.id.item_icon);
textBackground = (LinearLayout) itemLayoutView.findViewById(R.id.textBackground);
}
}
@Override
public int getItemCount() {
return mListObjects.size();
}
}Following is the layout_item.xml file that is used by the Adapter :
<?xml version="1.0" encoding="utf-8"?>

<RelativeLayout xmlns:android="http://schemas.android.com/apk/res/android"
    android:layout_width="match_parent"
    android:layout_height="match_parent"
    android:layout_alignParentBottom="true">

    <ImageView
        android:id="@+id/item_icon"
        android:layout_width="match_parent"
        android:layout_height="180dp"
        android:adjustViewBounds="true"
        android:scaleType="fitCenter"
        android:src="@drawable/ic_3d_rotation_red_200_48dp" />

    <LinearLayout
        android:id="@+id/textBackground"
        android:layout_width="match_parent"
        android:layout_height="50dp"
        android:layout_alignParentBottom="true"
        android:background="@color/colorPrimaryDark">

        <TextView
            android:id="@+id/item_title"
            android:layout_width="match_parent"
            android:layout_height="match_parent"
            android:gravity="center"
            android:text="name"
            android:textColor="#FFFFFF"
            android:textSize="25sp" />
    </LinearLayout>
</RelativeLayout>
So, you can see in the adapter that whenever OnBindViewHolderis called, we are using the Glide to load the bitmap of the image for that particular position and after the bitmap is loaded, first it is set as background to the imageView and next Palette is used to extract the color Asynchronously.