Firebase Android Tutorial 4 : What is Firebase Storage?
This is our fourth part on Firebase Android Tutorial series. Firebase Storage can be used to upload and share user generated contents like images, videos, songs etc. to the cloud. Unlike “Realtime Database”, as we have seen in our previous tutorial, Firebase storage uses Google cloud Storage to store data.
Prerequisites :
First, We will create one new activity in the same project that we will use to upload, download and delete a file. ( Please check previous tutorials for more info )
-
Create one New Activity as “StorageActivity.java” with layout file “activity_storage.xml”.
-
Add one textview inside MainActivity below ”Real Time Database” text , clicking on which will start ”StorageActivity” :
<TextView
android:text="Test Storage"
android:layout_width="wrap_content"
android:layout_height="wrap_content"
android:layout_below="@+id/realTimeDatabase"
android:layout_centerHorizontal="true"
android:layout_marginTop="35dp"
android:id="@+id/storageDatabase" />
storageDatabase = (TextView)findViewById(R.id.storageDatabase);
storageDatabase.setOnClickListener(new View.OnClickListener() {
@Override
public void onClick(View view) {
Intent i = new Intent(MainActivity.this, StorageActivity.class);
startActivity(i);
}
});- Our activity_storage contains three buttons as ”upload” , ”download” and ”delete” :
<?xml version="1.0" encoding="utf-8"?>
<RelativeLayout xmlns:android="http://schemas.android.com/apk/res/android"
    xmlns:app="http://schemas.android.com/apk/res-auto"
    xmlns:tools="http://schemas.android.com/tools"
    android:id="@+id/activity_storage"
    android:layout_width="match_parent"
    android:layout_height="match_parent"
    tools:context="com.codevscolor.firebasedemo.storage.StorageActivity">

    <ProgressBar
        style="?android:attr/progressBarStyleHorizontal"
        android:layout_width="match_parent"
        android:layout_height="17dp"
        tools:layout_editor_absoluteX="0dp"
        tools:layout_editor_absoluteY="0dp"
        android:id="@+id/progressBar2"
        android:layout_alignParentTop="true" />

    <Button
        android:text="Delete"
        android:layout_width="wrap_content"
        android:layout_height="wrap_content"
        tools:layout_editor_absoluteX="150dp"
        tools:layout_editor_absoluteY="376dp"
        android:id="@+id/button_delete"
        android:layout_below="@+id/button_download"
        android:layout_alignRight="@+id/button_download"
        android:layout_alignEnd="@+id/button_download"
        android:layout_marginTop="80dp" />

    <Button
        android:text="Download"
        android:layout_width="89dp"
        android:layout_height="49dp"
        android:id="@+id/button_download"
        app:layout_constraintTop_toBottomOf="@+id/button_upload"
        android:layout_marginTop="101dp"
        app:layout_constraintRight_toRightOf="@+id/button_upload"
        android:layout_below="@+id/button_upload"
        android:layout_alignLeft="@+id/button_upload"
        android:layout_alignStart="@+id/button_upload" />

    <Button
        android:text="Upload"
        android:layout_width="89dp"
        android:layout_height="49dp"
        tools:layout_editor_absoluteX="152dp"
        tools:layout_editor_absoluteY="183dp"
        android:id="@+id/button_upload"
        android:layout_marginTop="131dp"
        android:layout_below="@+id/progressBar2"
        android:layout_centerHorizontal="true" />

</RelativeLayout>-
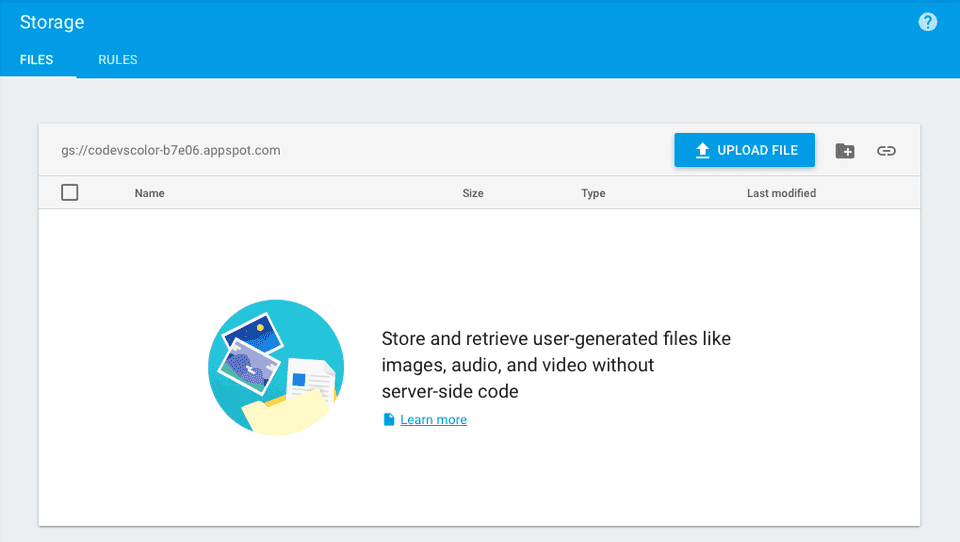
Open your firebase project and click on ”Storage” tab. Copy the link mentioned inside ”Files” tab.

-
By Default, Firebase only allows authorized users to read/write on Storage. Rules are defined inside “Rules” tab. Change it to following:
// Anyone can read or write to the bucket, even non-users of your app.
// Because it is shared with Google App Engine, this will also make
// files uploaded via GAE public.
service firebase.storage {
  match /b/<your-firbase-storage-bucket>/o {
    match /{allPaths=**} {
      allow read, write;
    }
  }
}
Now, anyone can read or write data without any authentication.
- File uploading to Firebase Storage:Clicking on ”Upload” button will invoke ”public void upload(View v) ” method inside our application to upload a file:
public void upload(View v) {
progressBar.setVisibility(View.VISIBLE);

// Create a storage reference
StorageReference storageRef = storage.getReferenceFromUrl("gs://codevscolor-b7e06.appspot.com");

// Create a reference to 'images/sample_image.jpg'
StorageReference imageReference = storageRef.child("images/sample_image.jpg");

//get byte array of the image
imageView.setDrawingCacheEnabled(true);
imageView.buildDrawingCache();
Bitmap bitmap = imageView.getDrawingCache();
ByteArrayOutputStream baos = new ByteArrayOutputStream();
bitmap.compress(Bitmap.CompressFormat.JPEG, 100, baos);
byte[] data = baos.toByteArray();

//create metadata
StorageMetadata metadata = new StorageMetadata.Builder()
.setContentType("image/jpg")
.build();

UploadTask uploadTask = imageReference.putBytes(data,metadata);

//register listener to the uploadtask object
uploadTask.addOnProgressListener(new OnProgressListener<UploadTask.TaskSnapshot>() {
@Override
public void onProgress(UploadTask.TaskSnapshot taskSnapshot) {
int progress = (int)(100.0 * (taskSnapshot.getBytesTransferred() / taskSnapshot.getTotalByteCount()));
progressBar.setProgress(progress);
}
}).addOnFailureListener(new OnFailureListener() {
@Override
public void onFailure(@NonNull Exception exception) {
Toast.makeText(context,"Upload failed !!"+exception,Toast.LENGTH_LONG).show();
}
}).addOnSuccessListener(new OnSuccessListener<UploadTask.TaskSnapshot>() {
@Override
public void onSuccess(UploadTask.TaskSnapshot taskSnapshot) {
Uri downloadUrl = taskSnapshot.getDownloadUrl();
Toast.makeText(context,"Uploaded . You can use this download url "+downloadUrl,Toast.LENGTH_LONG).show();
progressBar.setVisibility(View.GONE);
}
});
}
a) First, we are creating a reference to the file name on firebase cloud. b) Next, byte array of the image view is prepared. c) Also, we are creating a metadata for the image file. d) And finally, byte array and metadata is saved to the firebase using putBytes() method. e) Above process returns an UploadTask object. We can register different types of listeners on this object.
That’s it. if everything works fine, then you will see a new folder with an image file as below:

- In above example, we are using a byte array to save an image. We can also upload from a Stream or from a local file.- To upload from a Stream, use:
InputStream stream = new FileInputStream(new File("path/to/images/sample_image.jpg"));
uploadTask = imageReference.putStream(stream);
- Similarly, for a local file, use:
Uri file = Uri.fromFile(new File("path/to/images/sample_image.jpg"));
StorageReference ref = storageRef.child("images/"+file.getLastPathSegment());
uploadTask = ref.putFile(file);- Firebase Android Tutorial : Managing Uploads:
We can pause, resume or cancel uploads. Pause and resume events raises pause and progress state changes. Canceling an upload will fail it with an error indicating that the upload was canceled.
//pause
uploadTask.pause();
//resume
uploadTask.resume();
//cancel
uploadTask.cancel();
- Download :
a ) Download to a local file:Downloading a file is similar to upload:
public void download(View v) {
    progressBar.setVisibility(View.VISIBLE);
    progressBar.setIndeterminate(true);
    // Create a storage reference
    StorageReference storageRef = storage.getReferenceFromUrl(BUCKET_NAME);

    // Create a reference of the image
    StorageReference imageRefer = storageRef.child("images/sample_image.jpg");

    File localFile = null;

    String root = Environment.getExternalStorageDirectory().toString();
    File dir = new File(root + "/firebase_images");

    try {
        dir.mkdir();
        localFile = File.createTempFile("firebase_image",".jpg",dir);
    } catch (IOException e) {
        Toast.makeText(context,"Exception occurred ",Toast.LENGTH_LONG).show();
        progressBar.setVisibility(View.GONE);
        e.printStackTrace();
    }
    if (localFile != null) {
        Toast.makeText(context,"Downloading to "+localFile.getAbsolutePath(),Toast.LENGTH_LONG).show();
        imageRefer.getFile(localFile).addOnSuccessListener(new OnSuccessListener<FileDownloadTask.TaskSnapshot>() {
            @Override
            public void onSuccess(FileDownloadTask.TaskSnapshot taskSnapshot) {
                Toast.makeText(context, "Downloaded !!", Toast.LENGTH_LONG).show();
                progressBar.setVisibility(View.GONE);
            }
        }).addOnFailureListener(new OnFailureListener() {
            @Override
            public void onFailure(@NonNull Exception exception) {
                Toast.makeText(context, "Failed !!" + exception, Toast.LENGTH_LONG).show();
                progressBar.setVisibility(View.GONE);
            }
        }).addOnProgressListener(new OnProgressListener<FileDownloadTask.TaskSnapshot>() {
            @Override
            public void onProgress(FileDownloadTask.TaskSnapshot taskSnapshot) {

            }
        });
    }
}
In this example, we are downloading it directly to a local file.
b) Download as a byte array:
We can also download the image as byte array. But since this process will load the whole file into memory, and if we request a file larger than the available memory, it will crash. To handle this memory issue, getBytes() takes the maximum amount of bytes to download.
final long ONE_MB = 1024 * 1024;
imageRefer.getBytes(ONE_MB).addOnSuccessListener(new OnSuccessListener<byte[]>() {
@Override
public void onSuccess(byte[] bytes) {

}
}).addOnFailureListener(new OnFailureListener() {
@Override
public void onFailure(@NonNull Exception exception) {

}
});
c) Download using URL:
We can use the getDownloadUrl() method to get the URL of a file that can be used with other third party libraries to download the file.
storageRef.child("images/sample_image.jpg").getDownloadUrl().addOnSuccessListener(new OnSuccessListener<Uri>() {
@Override
public void onSuccess(Uri uri) {

}
}).addOnFailureListener(new OnFailureListener() {
@Override
public void onFailure(@NonNull Exception exception) {

}
});

// Alternative way
storageRef.child("images/sample_image.jpg").getDownloadUrl().getResult();- Firebase Android Tutorial : Deleting a file:
public void delete(View v) {
        StorageReference storageRef = storage.getReferenceFromUrl(BUCKET_NAME);

        StorageReference imageRef = storageRef.child("images/sample_image.jpg");

        // Delete the file
        imageRef.delete().addOnSuccessListener(new OnSuccessListener<Void>() {
            @Override
            public void onSuccess(Void aVoid) {
                Toast.makeText(context, "Deleted !!", Toast.LENGTH_LONG).show();
                progressBar.setVisibility(View.GONE);
            }
        }).addOnFailureListener(new OnFailureListener() {
            @Override
            public void onFailure(@NonNull Exception exception) {
                Toast.makeText(context, "Failed !!" + exception, Toast.LENGTH_LONG).show();
                progressBar.setVisibility(View.GONE);
            }
        });

    }
These are the basics for uploading a file to the Firebase Database. You can download this Firebase Android Tutorial project from Github.

